
People are often confused by how I create my art so I thought this week I'd show the steps on how I created my Minnehaha Falls art. First I visit the falls and take some photos. The leaves haven't changed yet but I can see the basic elements of the bridge, water, people and the falls. Then I take all my photos and start sketching in pencil on paper how I want to interpret the visual. I enhance the water, stylize the bridge, widen the falls and frame the scene with foliage. Then I take my drawing and scan it into the computer where it becomes the base of my color art.

Each line becomes a closed shape I redraw with the mouse and that is given a color chosen by me. I start with the background images and put it on a layer, working in Adobe Illustrator. The thought process is comparable to silkscreen with layers of opaque colored shapes but with the flexibility of the computer to make adjustments along the way.
After the background pencil lines are outlined, then I outline all the shapes of the rock and waterfall, followed by the hill in the foreground. You can see each layer with color and how the drawing looks as black outlines. The computer is just a tool that you tell what to do, it doesn't make any artistic decisions. I used to be an airbrush artist doing this same style and trying to remix colors to match was a nightmare, let alone making changes and having to repaint areas. Sometimes I use colors from previous illustrations like the water color here is the same as the water color I used in the Stone Arch Bridge illustration.
I hope this clarifies the artistic process in creating my illustrations from pencil to final art.
 |
| pencil drawing done by hand |
 |
| Use mouse to redraw all lines into shapes |
 |
| Background layer with shapes given color. |
 |
| Middle layer of falls with colored shapes |
 |
| Foreground layer given color. |
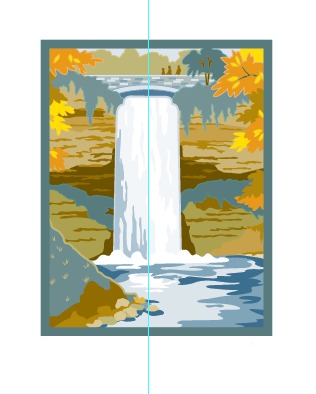 |
| All three layers in color with a border |

 People are often confused by how I create my art so I thought this week I'd show the steps on how I created my Minnehaha Falls art. First I visit the falls and take some photos. The leaves haven't changed yet but I can see the basic elements of the bridge, water, people and the falls. Then I take all my photos and start sketching in pencil on paper how I want to interpret the visual. I enhance the water, stylize the bridge, widen the falls and frame the scene with foliage. Then I take my drawing and scan it into the computer where it becomes the base of my color art.
 Each line becomes a closed shape I redraw with the mouse and that is given a color chosen by me. I start with the background images and put it on a layer, working in Adobe Illustrator. The thought process is comparable to silkscreen with layers of opaque colored shapes but with the flexibility of the computer to make adjustments along the way.


No comments:
Post a Comment